
How to use LUTs in Adobe Photoshop – Quick & easy (2 Methods)
New & Updated 2024
Photoshop + LUTs
How to use LUTs in Adobe Photoshop – Even though there are quite a few factors that influence the quality of a photo, it’s not just about the camera. Sometimes, that amazing element that changes everything can be easily enhanced by using a look-up table, so let’s go ahead and see how to use LUTs in Adobe Photoshop.
LUTs are also known as Look-Up Tables. They are generally used in the photography and film industries in order to apply specific and distinctive effects to footage. They make the whole color grading process easier and will help you develop a unique style.
In this tutorial, you will see how you can add LUTs in Photoshop, and how to actually use them in order to achieve impressive results for your photos. Before you go ahead and start playing with the LUTs, make sure to also check the right type of settings your camera needs.
Important Guidelines Before Using LUTs
- Ensure white balance is correct when using LUTs! This will dramatically change the look of the LUT.
- Ensure your exposure is correct when using LUTs. You can use a histogram to help in camera or editing software.
- When using LUTs, your footage may need small adjustments to get optimal results, such as exposure, saturation, contrast, etc. depending on your preference.
- Shooting conditions such as lighting, weather, locations etc. can vary which can drastically affect a LUTs look. Some LUTs will work better in different scenarios. It’s best practice to experiment with which LUTs work best for your style and scenes.
How To Add LUTs To Photoshop
Well, you have two ways to add LUTs to Photoshop. The first one is pretty straightforward, and you only need to locate the LUT and add it on that specific project. The other one, is a little bit more complicated, but it allows you to always access your LUTs.
Method 1: Add the LUTs to one specific project.
1. Unzip The LUTs
In order to add the LUT to your project, you need to unzip it. This is pretty straightforward and you can either use a specialised software or the Windows built-in unzipping tool.
2. Open Your Project
When talking about Photoshop, the project is usually an image, so go ahead and open that. Either by clicking on ‘Ctrl+O’ to open a new one, or import something from your cloud.
3. Create A New Color Look-Up Adjustment Layer
You can do this by clicking the ‘Color Lookup’ button in the ‘Adjustments’ tab.

4. Open Your LUT
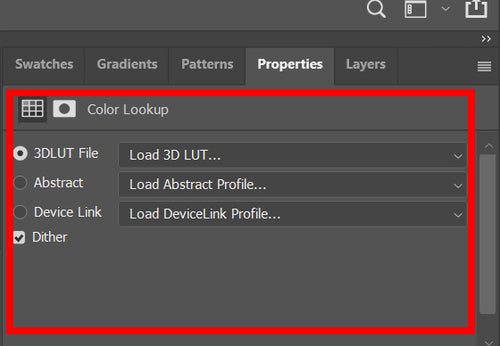
Click on the ‘Load 3D LUT’ button, and then point Photoshop to the location you unzipped the LUT files to.

Method 2: Install the LUTs
For the second method, you will need to actually install the LUTs into Photoshop’s installation folder.
1. Open the LUT folder (Change *version* to your version)
For Windows users, that should be at:
‘C:\Program Files\Adobe\Adobe Photoshop *version*\Presets\3DLUTS’
While Mac users should be able to find it at:
‘Applications/Adobe Photoshop *version*/Presets/3DLUTS’
2. Copy your LUTs
All you need to do is copy your LUTs into that folder. Make sure Photoshop is closed when you start doing this, and your project saved. Otherwise, it can crash and you’ll lose everything you did.
When you’re done, you can open Photoshop and search for your LUTs in the “Color Lookup” settings.
Now you know how to use LUTs in Photoshop, and you will definitely have a blast creating a style for yourself!
And you’re done!
Now you can go ahead and get your favorite LUTs installed on your computer and apply them on your video footage to get the best out of your work. Get those creative juices flowing!
Should you find yourself troubled with any of the above, fear not, we’ve got you! Just let us know by contacting us and we will get you going in no time.
Have fun!
TRY
15 Boudoir Photoshop Actions and LUTs
Boudoir photography is about capturing intimate, sexy, flattering, and sometimes naughty photographs with taste and creativity.
Our aim is to provide you with a beautiful and intimate photography experience that makes you feel special and empowered.
Boudoir filters are Photoshop Actions that are designed to give your images a trendy, warm, stylish look.
Each actions has been tuned precisely to give a unique depth and aesthetic to your boudoir portrait imagery.
Enjoy our collection
—–This set includes—–
-15 Unique Photoshop actions (.lrtemplate file)
-1 installation guide for Photoshop action (.pdf file)
-15 Unique ACR Presets (.xmp file)
-1 installation guide for Adobe Camera Raw(ACR) presets (.pdf file)
More details about these actions

-Compatible with Photoshop CC and later (with Adobe Camera Raw 6.6 and later)
-Instantly download the digital file
-Works on RAW and JPEG images
-100% adjustable and customizable
—–More details about these ACR presets—–
-Compatible with Photoshop CS6 and later (with Adobe Camera Raw 6.6 and later)
-Instantly download the digital file
-Works on RAW and JPEG images
-100% adjustable and customizable
—–More details about these LUTs presets—–
Cube LUTs are compatible with a number of photo and video editing software programs on the market including:
Adobe Speedgrade
Adobe Premiere Pro & CC
Adobe After Effects CS6 & CC
Adobe Photoshop CS6 & CC
Davinci Resolve
Final Cut Pro


